 A roll of thick wire and a few different sizes of pliers was all I needed to start. This was a difficult process and even harder to photograph! I started with the first few wires that would be the main part of the mobile and, as soon as I could, I hung it from my dining room chandelier so I could see how the mobile was balancing. After I finished the wire I felt like I had a little more confidence in myself and the process became easier and more fun as I continued.
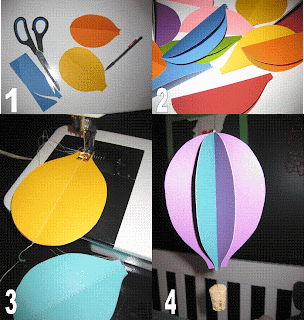
 The ballons were actually very simple! 1.) Using double sided card stock, (actually note cards that I already had) I cut out the shape of my balloons. Each balloon needed 4 pieces of paper. 2.)I folded them each in half and then 3.) stacked four pieces together and sewed a straight line up the center. 4.) Lastly, I carefully "opened" up the ballon to show all the colors and, using clear fishing line, attached a cork and a bead underneath for the basket.
I think the mobile would have been adorable if I had stopped here... but I just can't pass up an opportunity to use a blacket stich on some fuzzy wool felt! So I cut out some clouds and a sun- stiched and stuffed them and hung them from the wire. Finally I hung the ballons below the clouds and the mobile was complete! I love the finished product!


No comments:
Post a Comment